Main Tools
Set Weight
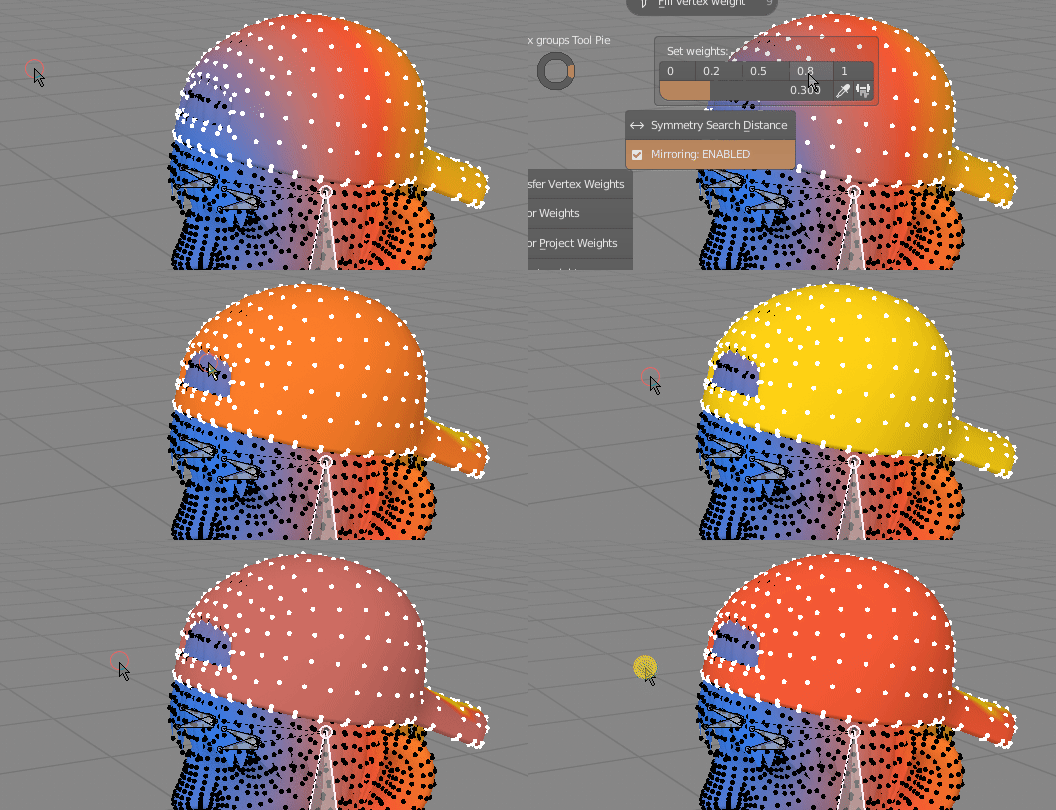 Set Weight - is modal operator that lets you adjust selected vertices weights.
Set active vertex group weight to one of values: 0, 0.2, 0.5, 0.8, 1. Then you can increase or decrease weights by +/- 0.1 by scrolling up or down with middle mouse button.
There are three mixing modes (changed by pressing 'M' key):
Set Weight - is modal operator that lets you adjust selected vertices weights.
Set active vertex group weight to one of values: 0, 0.2, 0.5, 0.8, 1. Then you can increase or decrease weights by +/- 0.1 by scrolling up or down with middle mouse button.
There are three mixing modes (changed by pressing 'M' key):
- Replace - replaces existing weighs with new target value.
- Add - add weight to old one
- Subtract - remove weight from old one
You may also choose to normalize resulting weights (with 'N' key).
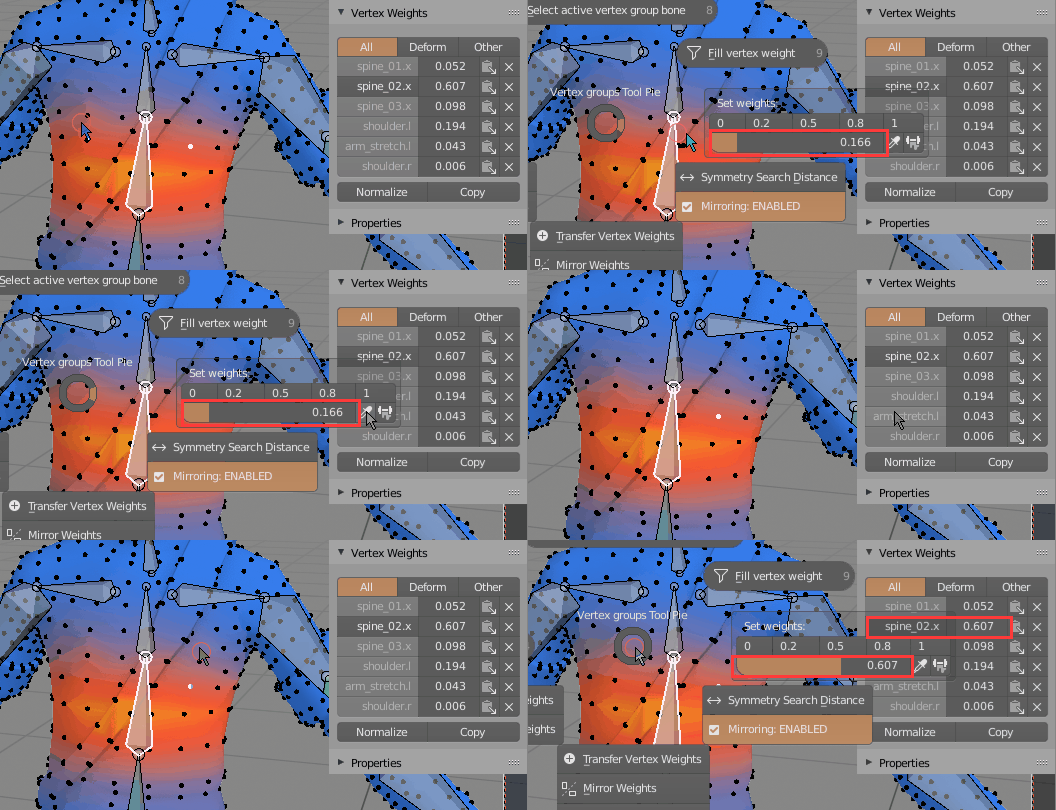 Pick weight helper button - copies active vertex group weight (0.607) from vertex. Now you can use icon on right, to fill selected vertices with this 0.607 weight
Fill vertex weight
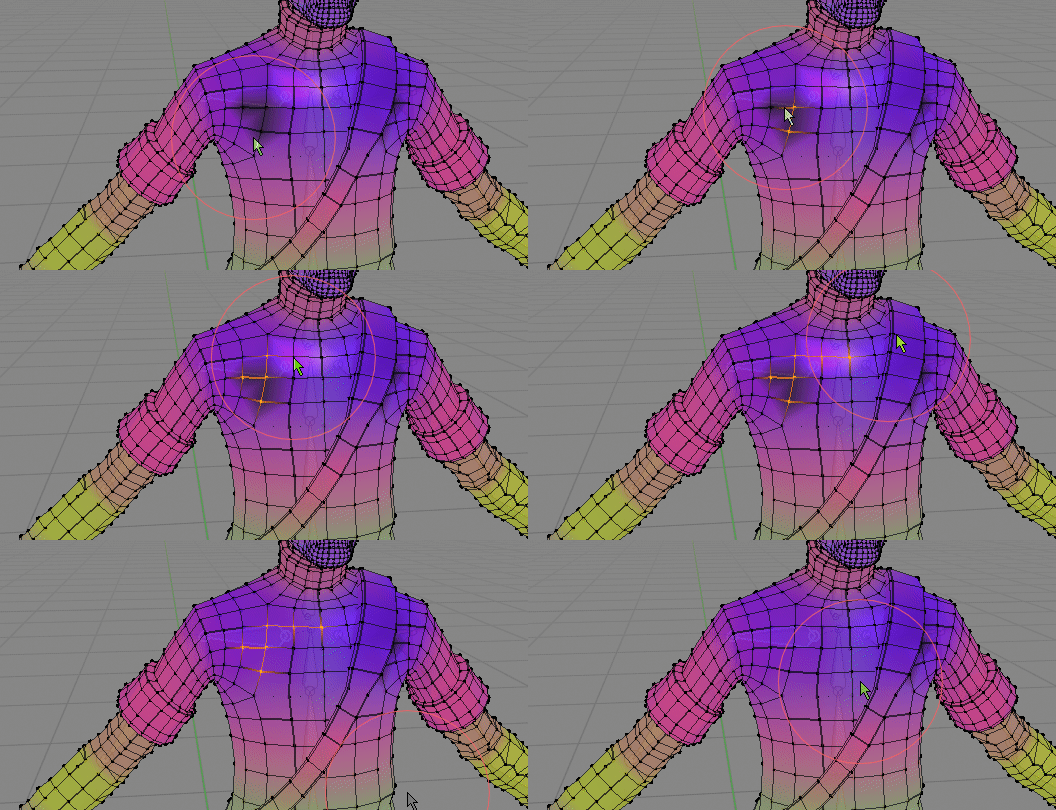
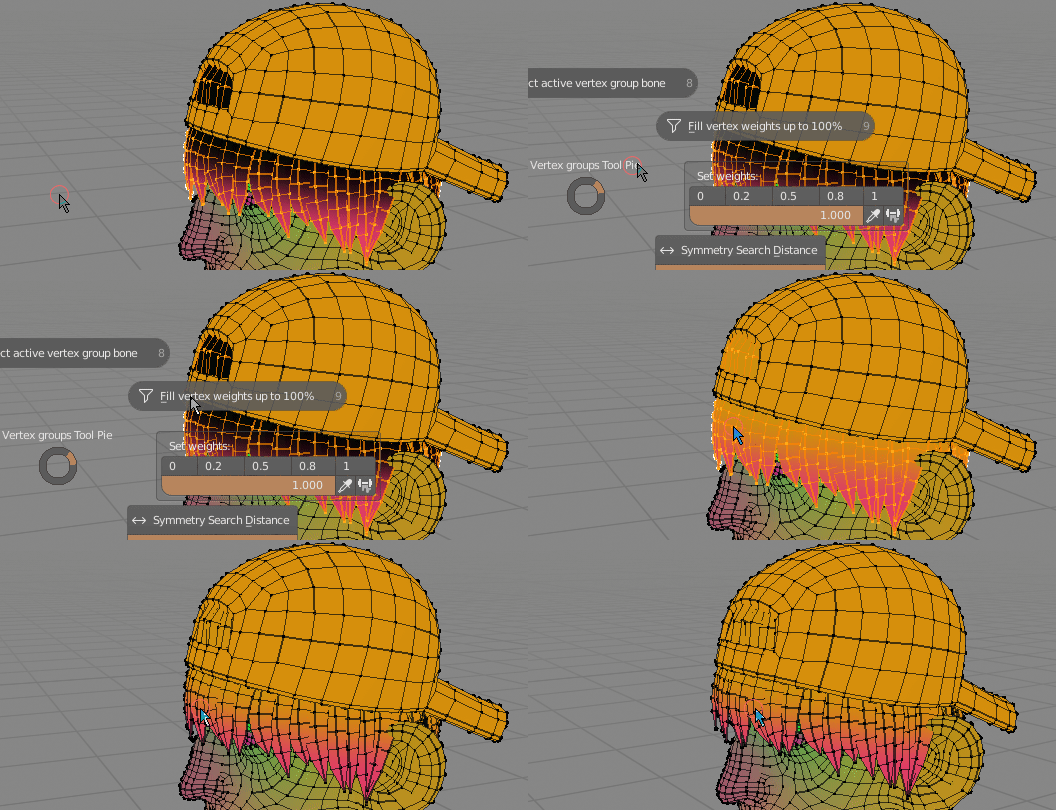 Filling dark spots (low vertex weights) with head bone weight, to pin hair to head
If vertex weight is low (total sum of vert weights is below 1), then increase active vertex group weight until sum reaches 100%
Select active vertex group bone
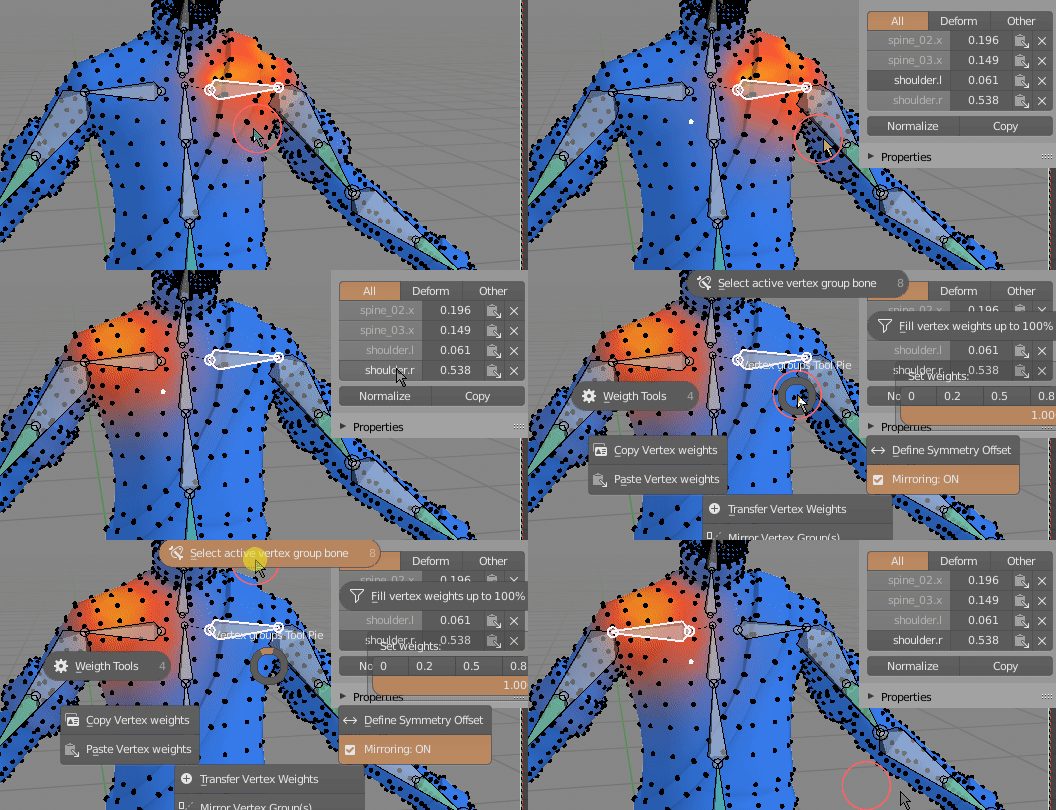 On more complicated rigs it may be hard to find bone that influences selected vertices
Select bone based on current active vertex group
On more complicated rigs it may be hard to find bone that influences selected vertices
Select bone based on current active vertex group
Copy / Paste Vertex weights
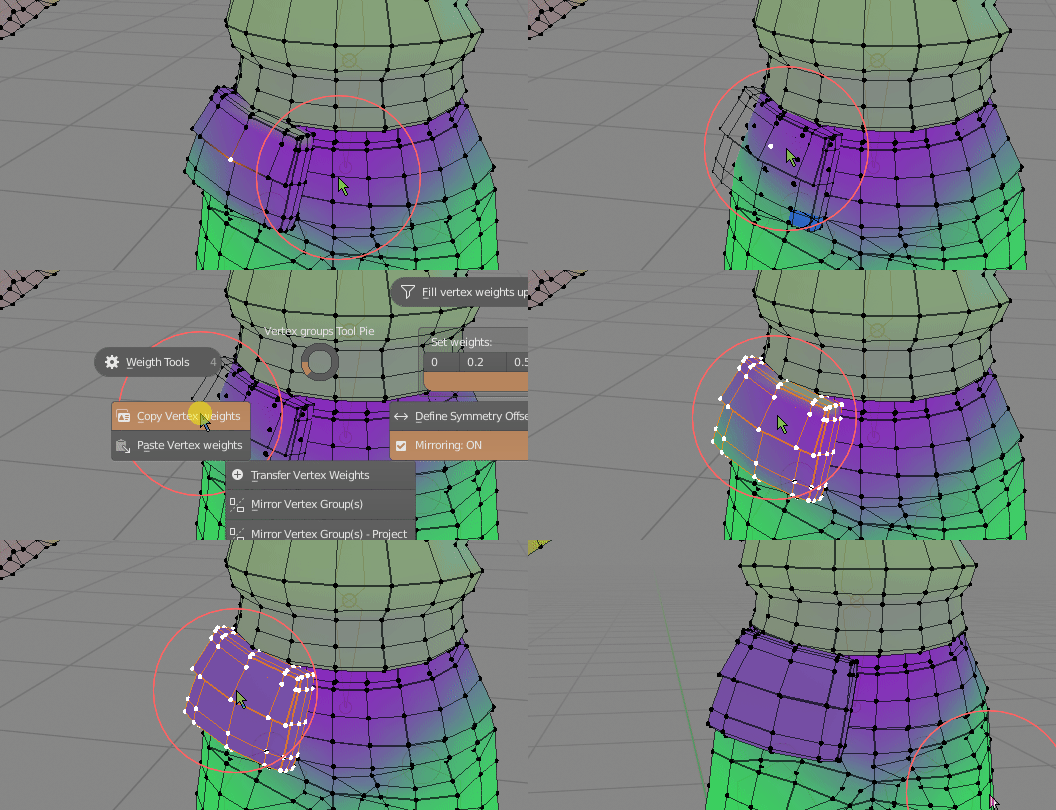 You can copy one vertex weight (from belt), and paste to pouch to make it more rigid (it will have same vertex weights on all vertices)
Copy all Vertex weights from selection and paste to target vertices.
You can copy one vertex weight (from belt), and paste to pouch to make it more rigid (it will have same vertex weights on all vertices)
Copy all Vertex weights from selection and paste to target vertices.
- you can copy one vertex weights to multiple target vertices (like on gif above)
- if you copy N vertices, then paste to N target vertices, the order of selected vertices weights will be preserved
Transfer Vertex Weights
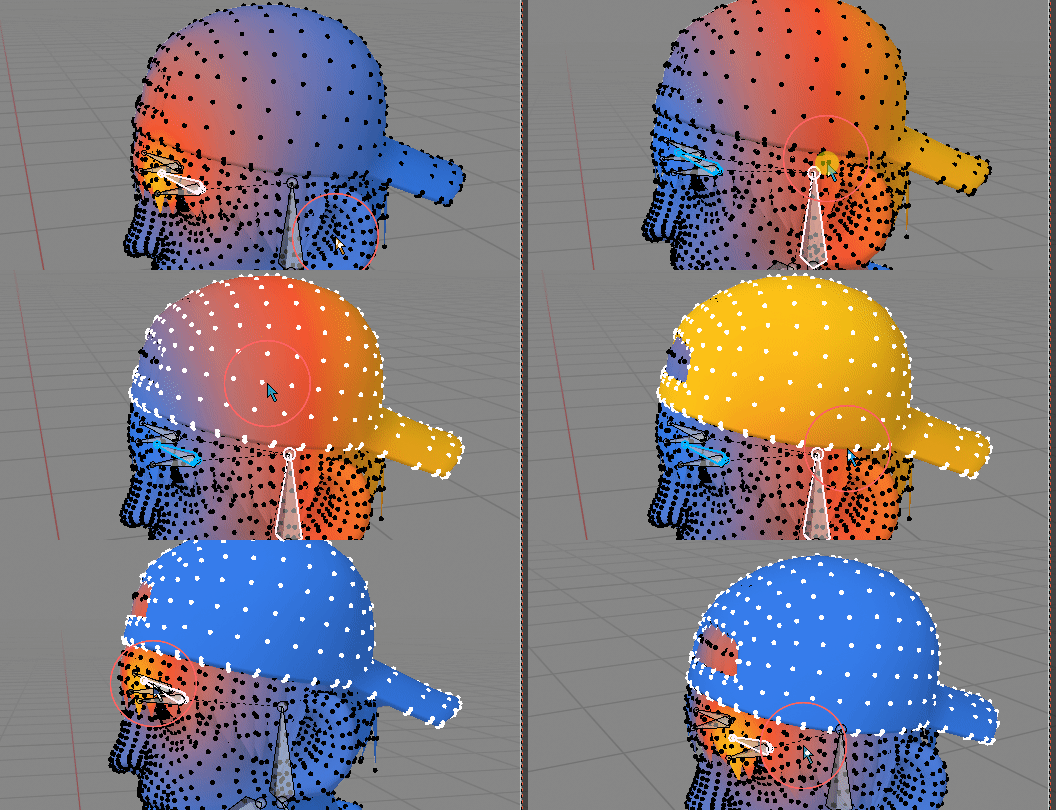 Transfer weights from eyelid bone to head bone on selected vertices
Select source bone A - then target bone - B. Weights on selected vertices will be moved from vertex group A to B
This operator has few properties (F9) key:
Transfer weights from eyelid bone to head bone on selected vertices
Select source bone A - then target bone - B. Weights on selected vertices will be moved from vertex group A to B
This operator has few properties (F9) key:
Mixing Method of vertex group A with B (target / receiver):
- Replace - Replace weight B with A
- Add - Add A to B
- Lighten - Lighten
- Difference - subtract weighs A from B
- Multiply - Multiply A times B
Clear Source Weights - if true remove vertex weights from source vertex group A
Mirror Weights
Transferring weight from right side, to left using Mirror operator
How To use:
- select 'source' side of mesh (usually with correct weights),
- run 'Mirror Weights' from Ctrl+X pie menu.
Pairing range of mirrored verts is defined by 'Symmetry Search Distance' parameter. Bigger value will make it easier to find mirrored vert.
Properties (F9):
Target:
- Active - mirrors only active group
- Selected Bones - mirrors vert groups that are linked to selected bones
- Deformer Bones - mirrors vert groups are assigned to Deformer Bones from character rig
- All Groups - mirrors all vert groups
Symmetrize:
- Off - mirrors weights from one side to another
- Soft - same as above, but if vertex group has no mirrored counterpart (e.g. Spine or Head vert groups), then symmetrize them. Rest of weights will be mirrored. This is the default option
- Force - all vertex groups will be symmetrized. Usually not what you want, since it will, for example, assign weights to Arm.R from both sides of character (rather than just from right side)
Automatically pick sampling side - if you select bone or verts on right side, then weights from right will be mirrored to left (and vice versa). Disable it to manually pick if sampling should be done from Left or Right side of character.
Mirror Project Weights
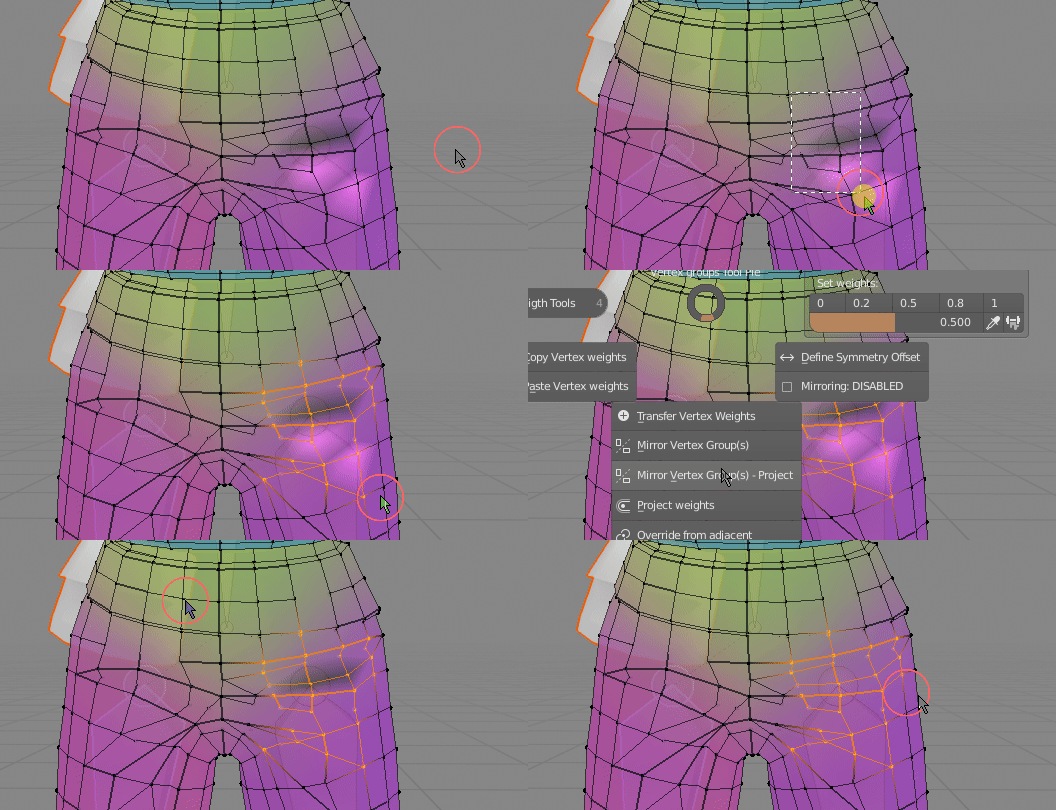 Fixing broken pants. Notice that pants topology is not symmetrical
Same as 'Mirror Weights' but works great with non symmetrical topology meshes. The main difference in workflow is that you select the 'broken' side of mesh first, then run 'Mirror Project', so it is reverse of how normal 'Mirror Weights' work (where you select fixed side of mesh first)
Fixing broken pants. Notice that pants topology is not symmetrical
Same as 'Mirror Weights' but works great with non symmetrical topology meshes. The main difference in workflow is that you select the 'broken' side of mesh first, then run 'Mirror Project', so it is reverse of how normal 'Mirror Weights' work (where you select fixed side of mesh first)
Properties (F9):
- All Groups - if True mirror all vertex group to selected vertices (or just active one if set to False)
- Symmetrize - instead of mirroring vertex group from left bone to right bone, symmetrize vertex group(s). Useful for center bones - eg spine.
Project weights
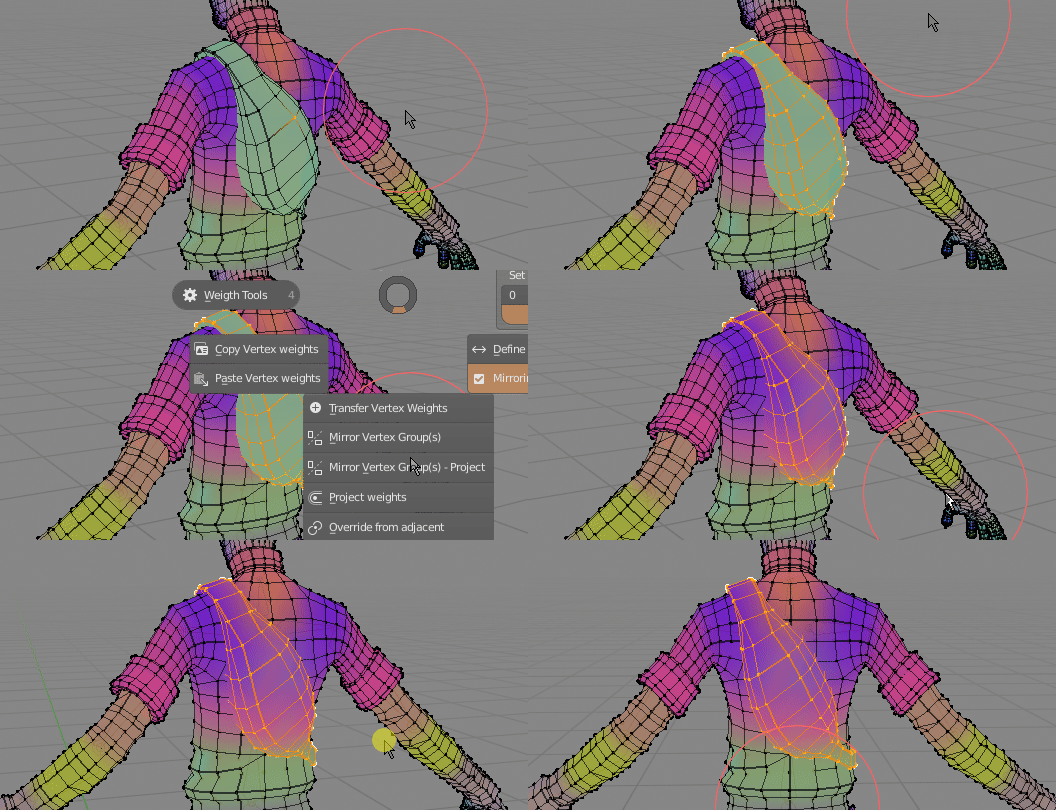 In this case weights from body are projected to backpack
Project weights from non selected mesh parts to selection
Override from adjacent
 Override selected verts weights from adjacent non selected vertices. Helpful in removing broken vertices.
Voxel Skinning
Voxel skinning is an alternative way of weight generation — it can help with fixing weight bleed between close or touching body parts (like fingers, armpits, or overlapping limbs) by using volumetric heat diffusion instead of surface distance, giving cleaner, more accurate deformations on layered or non-manifold meshes.
First result of default - built-in Blender automatic skinning. Then Voxel skining - notice smoother result and continuous weights distribution on border shirt to pants transition
Demo Video - on Youtube
- Armature — Target armature object to skin from.
- Bones — Source of bones to include in skinning:
- All Deform Bones — Use all deform bones in the armature.
- Selected Pose Bones — Use bones currently selected in Pose Mode.
- Bone Collection — Filter bones by Bone Collection.
- Affect Selection Only — Only skin selected mesh vertices (uses Weight Paint mask).
Demo of skining with higher voxel resolution on selected mesh part - hands. Its cheap way to get more detail in selected places, without having to add more voxels to whole character (which would be very slow - 2x resolution results in 8x more compute time)
Bone Radius
The bigger the bone radius, the more heat is spread out - resulting in smoother weights transitions.
- Bone Radius Mode — Method used to determine bone influence radius:
- Auto: Measure Mesh — Measures physical mesh thickness to estimate bone influence range.
- Read from Bones — Reads
head_radiusandtail_radiusdirectly from armature bones. - From Bone Length — Calculates radius from bone length multiplied by a factor.
- Fixed — Uses same fixed lateral bone range based on voxel size.
- Radius Multiplier — Multiplier applied to measured bone radius. Increases range of bone heat generation thus its weights — results in smoother transitions.
- Write Radii to Bones — Write the computed joint radii into armature bone envelopes (
head_radiusandtail_radius). - Adjacent Bone Blending — Fraction of bone length that bleeds into adjacent bones at joints — results in smooth bending at elbows/knees.
Voxelization
- Grid Resolution — Voxels along the longest dimension (16–1024, default 100). Higher = more detail, slower computation.
- Voxel Padding — Number of voxels added on boundary surface — can help to cover outer parts of mesh (0–4).
- Smooth Iterations — Number of 3D voxel smoothing passes across solid neighbors.
- Smooth Factor — Strength of in-memory 3D voxel-space weight diffusion per pass (0.0–1.0).
- Max Influences — Maximum number of bones affecting each vertex (1–8, default 6).
Debug
- Show Debug Mesh — Display the internal voxel point cloud with raw weight attributes.