Hair Profiles
Demo showing various hair profiles available in Hair Tool
Hair Profile is the last modifier in Hair System stack. It's where curves receive:
- profile geometry,
- UV data,
- Material,
- sampled UVs and vertex Colors from source surface mesh,
Hair Tool will automatically assign default UVs and Material to new profile.
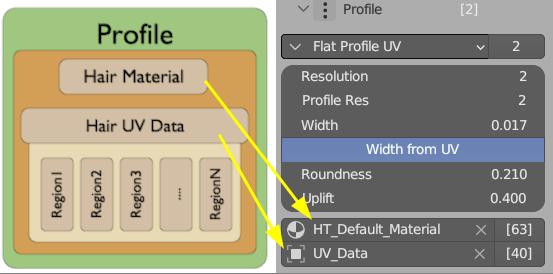 Profile Panel - where you can change profile type, material, etc.
Adding/Update curve profile
To add or edit curve profile, click 'Add (Update) Profile' button located in top pie menu (Ctrl+Shift+H by default).
All available profile types are explained below.
Profiles Types
No Profile (Blender Hair)
It will not generate any geometry on top of hair strands. Useful for built-in Blender curve Hair rendering (controlled in 'Curves' Panel in Cycles/Eevee Render Settings)
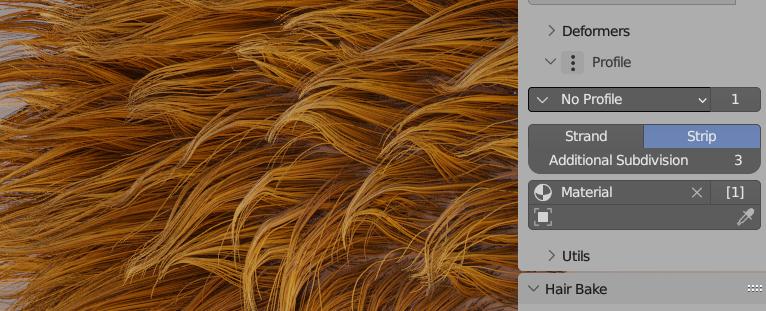
Parameters:
- Radius - blender strand radius - additional multiplier - on top of Set Radius deformer
And for convenience, there are also Blender 'Curves' settings exposed in Hair Tool UI:
- Curves Shape - Strand or Strip
- Additional Subdivision - additional subdivision of hair strands in viewport
Note: Blender curve profile wont render correctly, if Hair System is attached to mesh object. Use Ctrl+Shift+H -> Transfer Hair System -> To Empty Curve
Flat Profile
Flat profile is what you will usually want to use to generate game Haircards
- Width - hair-card width
- Resolution - resolution along strand length (more segments, gives smoother look without having to add more points to hair curve)
- Profile Resolution - resolution of profile cross-section
- Width From UV - hair-card width will be linked to its UV region width.
- Use random UV Flip - should UV be flipped randomly in X axis
Taper UVs by Radius - will taper hair-card UVs, based on hair-card taper
Curve Profile
Curve Profile - (with UV's) - any curve object can be used as custom hair profile - just like in old Blender curves.
Round Profile.
 It is only needed in hair texture baking setup. It does not support UV mapping, so it is not suitable for Haircards rendering
Circle Profile
 Simple Circle profile - it supports UV mapping.
- Width - hair-card width
- Resolution - resolution along strand length (more segments, gives smoother look without having to add more points to hair curve)
- Profile Resolution - resolution of profile cross-section
Braid Profile
In demo above you can see both curve taper and tilt is affecting the generated braids shape
- Global Scale - default value 1.0 is good for default cube (2 meters in size). For human head (which is 1/10th of default cube size) set it to 0.1
- Frequency - how dense braid interlacing is
- Main Radius - overall braid size
- Profile Radius - individual strands size (relative to Main Radius)
- Braid Resolution Factor - how many points should be generated for each period on braid (higher == smoother look)
- Radius Slide - The smaller the radius of guide curve, the more dense the braid becomes. Helps to give uniform look, when guide hair tapers
Curls Profile
Curls Profile solves the issue of Curls Deformer - it has perfect aligning of haircard to center of guide curve (new in HTool 2.44)
- Global Scale - default value 1.0 is good for default cube (2 meters in size). For human head (which is 1/10th of default cube size) set it to 0.1
- Frequency - how 'dense' curls are
- **Amplitude ** - overall curls size
- Width - hair-card width
- Gravity - Curls get tenser at the endings
- Influence Range - Blend between straight strand and curl over strand length
- Influence Width - control the strand width over its length
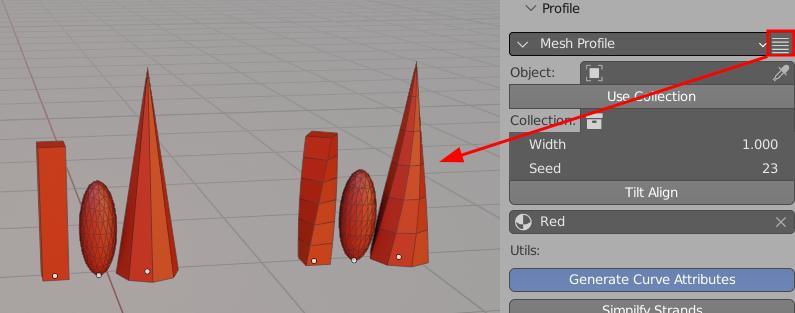
Mesh Profile
In this case I used Collection with 3 objects, to instance them along hair strands
Mesh profile objects should point up, and theirs origin be at the bottom. Otherwise, they may not align correctly to hair strands. Their length is not normalized, meaning taller objects will be longer after placing on hair strands (by match profile objects height > gives them same length).
Note: Fastest way to generate mesh profile is to use Profile Menu > Mesh From UV Boxes button.
 Slice Mesh Profile button will cut object using custom 'slicing' modifier. This way it will conform better to hair splines - only. Button is displayed next to Profile dropdown menu '✓'
Note: Slice Mesh Profile is using boolean operation in background. It may fail on more complicated objects - e.g. when mesh has self intersections.
UV's of mesh profile objects will be preserved when instanced on top of hair. Using multiple copies of same objects with different UVs is a good way to add some randomization to hair look.
Profile Menu
In this menu you can find various options for managing hair profiles.
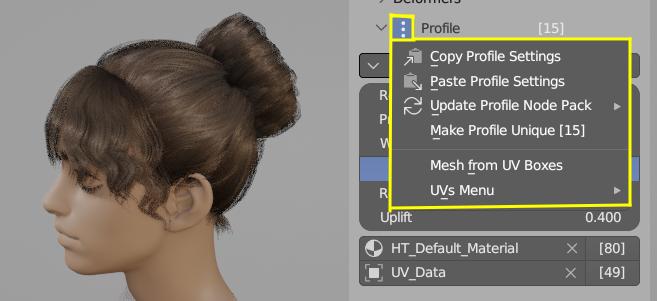
Copy And Paste Profile - copy profile from one hair system to another. It will copy all profile settings, UVs and material.
Update Profile Node Pack - update node pack for selected profile. It will update all nodes in node pack, and also add missing nodes. It is useful when you want to update profile node pack to latest version.
Make Profile Unique - unlink active profile settings from other hair systems (e.g. after pasting profile from another hair system).
Mesh From UV Boxes Create multiple mesh objects, based on Hair System UV boxes/regions. Use these objects as target in: Hair System > Profile Tab : Mesh Profile
UVs Menu - helper for copying and pasting profile UV_data, between Hair System profiles
Profile Other Settings
This sub-section of Profile panel contains extra profile options (UV and Color Sampling, profile simplification etc.)
Generate Attributes
Generate extra attributes like:
- Tangent - required for proper specular highlights (only if you use Hair Tool hair material)
- Factor - black and white gradient attribute along each strand length
- Random - each haircard will get random grayscale color attribute
- Sample UV - pick name of UV channel, that you want transfer from Source Surface mesh to strands. This attribute can be then accessed in Hair Material using Attribute Node with name SampledUV
- Sample Color - pick name of vertex Color that you want transfer from Source Surface mesh to strands. This attribute can be then accessed in Hair material using Attribute Node with name SampledColor
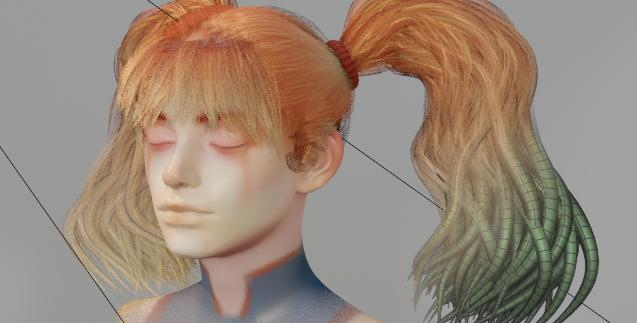
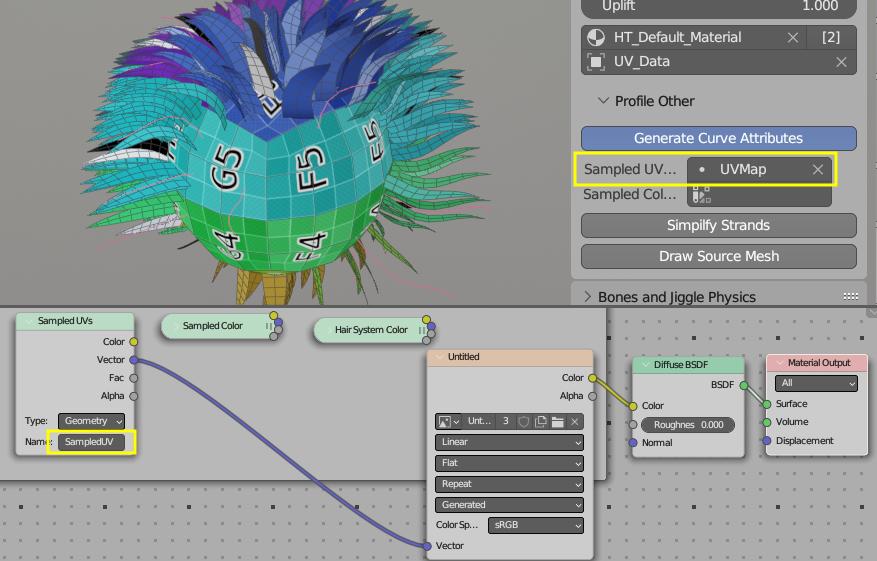 In setup above we sample
 UVMap from sphere. This generates attribute named SampledUV, which can be used to color strands with same texture as character body
Simplify Strands
Simplify Strands optimizes polycount of generated hair geometry, by assigning less points to shorter strands. This can easily cut polycount in half!
Draw Source Mesh
If Hair System is attached to source surface (scalp mesh in demo above), you can toggle drawing of this surface