Hair UV and Material setup
Default Hair Material
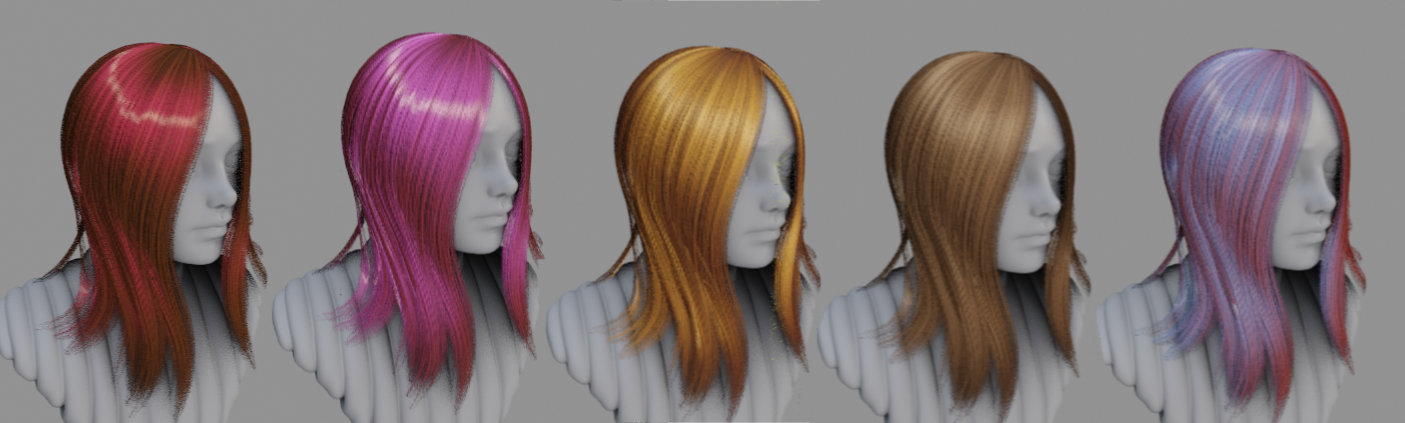
Hair Tool comes with built-in hair shader named HT_Defautl_Material. It was made to look best in real-time preview in EEVEE.
It is using single texture with:
- RGB channels for depth pass
- alpha channel for opacity
In most cases it will be assigned automatically by add-on, but you can also manually assign it by using: Ctrl+Shift+H Pie Menu, and run Import Default Hair material operator. It will assign default UV data too.
demo of build in Hair Tool Default material
Note1: If you want to plug in your own texture into Hair Material, make sure its UV input is connected to
HTool_UVnode. It will properly UV map your Hair Strands.
Hair System UV's
In Hair Tool, UV Data is attached to Hair System Profile.
The UV data hold information about UV Regions - rectangular uv Boxes that tells where to sample the texture.
UV Data does not tell which UV Regions should be assigned to which hair strand - for that use UV Region Set.
Unlike in Blender, where unique UV Map is attached to each mesh object, in Hair Tool UV data can be shared between Hair System Profiles. This way you can have multiple Hair Systems using same UVs (without having to define it multiple times)
Note1: Do not use Blender's build-in 'Convert-To->Mesh' operator on curve hair, or your output mesh UVs will be messed up. Instead, use Curve ribbons to mesh ribbons. This way curve Material UVs will be properly, converted to mesh UVs.
Defining Hair UV's
Using Hair UV button in UV image editor
To add/modify Hair System UVs:
- open UV Image Editor and press Hair UV button located in top header bar - on far right
- next use Left Click and drag rectangular shape, to define the UV bounds for texture mapping. You can drag corners of existing UV box to adjust its shape.
- To remove UV box, hover your mouse over one of uv boxes and press [Delete] key
-
To reset UV press Shift + Delete
-
Make sure Hair System has material assigned in 'Profile' properties (or use Import Default Material)
- Material UVs are outputted by
HTool_UVnode in Shader Editor - without it UVs won't work. After converting Hair System to mesh, you can use 'normal' mesh uvs - 'Hair UV' operator will automatically add UV Region Set Deformer if it was used on object with Hair System attached
To use UV Offset hover you mouse over UV box and scroll with MMB.
Material / UV Refresh
Helper Button that will automatically assign last used Hair Material, and UVs. If they are not found, it will assign Default Hair Tool Material and UVs.
Set UV region
After you defined UV Regions, you can assign them to hair strands using 'Set UV region' operator. It will assign UV Region index to selected hair strands. If you have multiple UV Regions selected, then it will randomly assign one of them to each selected hair strand.
- If you have hair curve selected (without Hair System attached), then UV Region Index will be stored directly in curve attribute
- If selected object (mesh or curve) has Hair System attached, then
UV Region Setwill create (or use existing) UV Region Set Deformer - to assing UVs Boxes to strands
Assigning UV regions to selected strands using Set UV Region. Shift click on multiple Regions to assign them randomly
Offset UV
It moves UV points more toward the root or tip on hair strand. As a result you can stretch UVs and change texture look. See video below:
Auto UV
If you have 'real' curve hair object with Hair Profile attached, then you can use Enable Auto UV to automatically assign UV regions to hair strands - without having to use Set UV Region manually, each time add or remove hair curve.
Auto UV - will randomly assign selected UV Regions/materials to hair strands.
In this example we Created few UV Regions. They are automatically assigned to hair strands thanks to Enable Auto UV feature
Enable Auto UV - is located in UV Image Editor -> Right side panel -> Hair Tool tab
ir_system.md lll